THE BLOG IS HAVING TROUBLE WITH COMMENTS! SOMETIMES THEY DON’T GET PUBLISHED, AND WHEN THEY ARE I AM UNABLE TO REPLY TO THEM. IF THAT HAPPENS, JUST EMAIL ME AT stitchlore@gmail.com.

Looking for something specific? Check out the Topic Index, or the Search bar, just below, on the left.


Sorry about this problem!

SO.........WHAT ARE WE WORKING ON TODAY??

Saturday, March 31, 2012

A little cutie

This shade is one of three for a guest suite- three different styles but all using the lime green in one way or another.  I'll do a post featuring all three, but I'm too impatient- I want to show off this little cutie, now.

The main fabric is a puckered faux silk, with a band on three sides.  For such a tiny shade, this one required a lot of contemplation- how to make a nice flat band on a puckered fabric?  I decided to topstitch it on.
First I laid out the lining, interlining, and face fabric, face fabric up.  I drew lines with my purple pen and basted just inside the line.  You know how I feel about hand-basting- it's worth every second.  There is something reassuring about basted fabric. 

The green was pressed under 1/2".   I planned to line it up against the purple pen line, but on the pucker fabric the line was too wobbly, so I re-marked with masking tape, butting it right up against a straightedge using the grid.  

You know how I feel about topstitching- when carefully done it is a beautiful detail and sometimes is the best technique for the situation.

 So I topstitched through all 3 layers with matching lime green thread.  Look at that glorious late afternoon spring sunshine!

The excess pucker fabric was cut away.

The green band wrapped around and covered the stitching line on the back.

The weight bar pocket was sewn and the trim glued to the stitching line, ending it where the designer specified.  Ta-da!  Some rings, some strings, and a cord lock- and it'll be done!

Wednesday, March 28, 2012

Dog-Ear Relaxed Shades Comparison

We had three dog-ear shades in one month, each for a different designer.  Although I have already shown them all in the past 3 weeks, I'm putting them all together in this post to easily compare how different widths affect the droop and silhouette.  The width of the "ears" varies in proportion to the shade width.

This is 72" wide, silk, and interlined; banded with velvet, no returns.  The ears are 8.5" wide.

Here is a plain lined silk, 44" wide plus returns, with 6" ears.  

And a teensy weensy dog-ear shade, 22" wide plus returns, 4" ears, made out of a crinkle sheer lined with lightweight lining.  

Tuesday, March 20, 2012

Variations on Wide Triple Relaxed Romans

I'm back- nobody even knew I was gone!- after a minor medical procedure, my world started spinning after a bad reaction to the painkiller I was prescribed, and it took five days to start to feel like myself again.  Yesterday I didn't try to sew much- I didn't quite trust myself to cut fabric!- so I went for a ride and delivered projects that were completed before I took off. 

Ready to be packed up- here are two extremes of relaxed Romans: a very wide shade- 96", actually to be used as an adjustable valance- with three swoops, made from a lightweight upholstery fabric and lined; on the right, a very narrow one- 22"- functional, with dog-ears.  By now you're used to seeing the workroom in all its glorious messiness, right?......

For the wide valance/shade, I showed the client the following pictures of approximately 90" wide shades so she could decide which variation she preferred.  As you can see, she chose the flat version with the least droop.


In the first, embroidered sheer linen is lined with batiste, and completely flat along the top.

Here, the top is flat, but the bottom flap that showcases the trim flattens out the droop.   I think these shades were closer to 100" so the sections are a little wider than those in the other three examples.  These were a plain sheer lined with voile.

Tiny pleats at each section add fullness to this unlined version.  The little bead trim at the bottom adds weight and helps accent the droop.

This lined cotton sheer shade has deeper pleats, and tails; it could be called a triple London shade; it was designed to complement the adjacent single London.

To complete my gallery of triple relaxed Romans, here is a center-pleat version made from antique satin, lined with Apollo.
The workroom shelf messiness from 10 months ago looks oddly similar to its current state, doesn't it?

Monday, March 12, 2012

Waiting

I spend a lot of time waiting.  I always have hand-sewing with me so I can be productive while waiting.  I'll sew anywhere- doctors' offices, park benches, in the car.  And once I get home, watching baseball on TV.   My favorite thing to sew while waiting is cafe curtains- small, easy to keep folded on my lap.
Here are some recent "waiting" projects:
Sewing rings onto cafe curtains- that's my faded bluejeans- at a doctor's appointment    

Side hems and rings with ladder tape- that's the steering wheel in the background

Side hems, rings & ladder tape- actually I think this was a football game
Hems, rings, and tape for a hobbled shade- waiting for a client
My travel sewing box- a lipstick holder is perfect for pins!

Friday, March 9, 2012

The hardest pillows I've ever made!

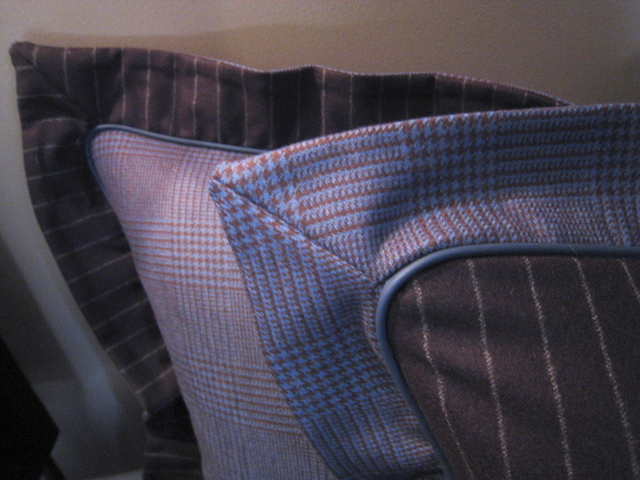
Earlier this week I showed the workroom sample pillow I made in order to work out the kinks before making the real pillows- the reversible inset flanged plaid and striped wool shams with leather welting on both sides.
Well, today was supposed to be the big day- the bed was to be delivered today, and we were all set to display the pillows spectacularly on the new bedding, and guess what, no bed!  Very disappointing!  So we arranged the pillows in the corner of the room and photographed them there.


I did a lot of research to decide on a fabrication method.  Making the sample pillow ensured that the technique was sound, but I also needed to be sure that it would work with the actual materials, since they were so challenging; so I then made one corner mock-up with the wool and leather.


The big aha moment came when I realized that I could apply the welt to the flange first, rather than to the pillow body.  More on that below.  I even put in a mini zipper to be sure that would work.  To my amazement, the zipper was easy.


Since the flanges were also reversible, I cut the plaid strips and laid them out to size and pressed in the diagonal miter before sewing.  Then I laid out the striped wool on top to be sure I was making them exactly the same size.  After sewing together and pressing, I used fusible interfacing to stiffen the flange and keep the fabrics from flopping apart.

As I said earlier, my big breakthrough moment was when I thought of applying the welt to the flange instead of the body of the pillow.  I tried that technique with the little corner mock-up and was really happy with it, so I forged ahead with the four pillows.

At the corner, I clipped the welt and made a big right-angle notch, so there would be no bulk when the pillow was turned right side out.  I left the needle in the work and pivoted the flange, so the sewing continued on a straight line.

Then the flanges were applied to the pillow bodies....

and the second layer of welting went on next.... 

and finally, eventually!,  the backs and the zippers.
Since so much time went into thinking, envisioning, experimenting, and practicing, the actual fabrication was easier than I had expected, and the outcome was quite dramatic.  I delivered these pillows happily!

Wednesday, March 7, 2012

Tapered box pleat valance

This is one of my favorite valance silhouettes: a barely rounded arch that reads more like a taper after pleating.  Combined with the added dimension of the double box pleat in the center and the knife-pleats at the ends, the simple shape acquires depth and movement.

The fabric had a mind of its own, so the night before the valance was stapled to the board, the pleats were pinned into place on the work table.

They were left weighted down until morning, and this self-lined valance pleated up perfectly on the board.
In the foreground you can see my diagram.  I have to draw out every detail to make sure I don't omit a pleat, or something, and to plan seams so it doesn't accidentally land in the front.

Monday, March 5, 2012

Inset Flanged pillow with welt both sides

I have recently had to master a pillow style that I've spent decades avoiding.  Inset flanges used to inspire, well, terror in me.
Now I've had an order which I'll be delivering this week for inset flange pillows, reversible, with welt ON BOTH SIDES and ZIPPER, and mitered corners on the flanges.
To make it even more challenging, the welt is LEATHER; the fabrics are WOOL; and the last paralyzing detail- one fabric is a plaid and one is a stripe.  On one side the body is the stripe and the flange is the plaid, and on the other side the body is the plaid and the flange is the stripe.

So in addition to practicing and making mock-ups, I made myself a complete pillow, and here is the result, front side:

And the back, with an invisible zipper:

And to prove that it really is one pillow, not two: 

More later in the week!

Friday, March 2, 2012

Another Dog-Ear Relaxed Roman

My friend Camille came over the other day to use our tables to make a shade for herself.  It turns out she was making a dog-eared relaxed Roman- which I had just made a couple of weeks before.  This one is 44" wide, with returns for an outside mount.

Here's the one we made recently, the interlined white silk with the yellow velvet 3/4" banding all around.  It is 72" wide and inside mounted.